How to Use Shrewd LMS: A User Guide
Step-by-step instructions for installing the app, setting up courses, adding and managing activities, and accessing reports — all within Microsoft Teams.
Adding Shrewd LMS App within Microsoft Teams
Install the app in Teams desktop or webThis guide is for regular users who want to use Shrewd LMS within Microsoft Teams.
Step 1: Open Microsoft Teams
- The Desktop App, or
- The Web App at https://teams.microsoft.com

Step 2: Find and add the App
- On the left sidebar, click on "Apps".
- In the search bar, type "Shrewd LMS".
- Click on the "Add" button to add the app.

Adding a Shrewd Course to Your Team and Channel
Create a Learning tab inside your selected Team/ChannelTo get started with Shrewd LMS for your team, follow these steps:
- Choose your desired Team and Channel.

- Inside channel page, add tab by clicking on "+" button.

- Click on Shrewd LMS app.

- Click Save to add a Learning tab.

- If successful, your page will look like this.

- The Learning tab will automatically appear on your Posts page once created.
Managing Courses Inside Shrewd LMS
Configure course settings, sections, activities, requirements, and orderingInside Shrewd LMS, you can build learning content by adding Sections and Activities (content types inside each section).
Activities supported: Text, Documents, BLC (requires active BLC subscription), Video, Audio, Link, Image, SCORM, Quiz, and Panorama Interactive.
Managing Course Settings
On your Learning page, click Edit Course.

Course Title and Cover Image
- Enter your Course Title.
- Click "Browse" to select a file, or drag-and-drop your image file.

Setting Course Start and End Dates
This defines when a course becomes available and when it expires. If not set, the course duration defaults to 1 year.
- Start Date - The date when the course becomes available to students.
- End Date - The date when the course expires and becomes unavailable.

Copying Content from an Existing Course
- Go to the Copy Content section.
- Click the dropdown menu.
- Select one of your existing courses from the list.

Archiving and Unarchiving Courses
Archived courses remain visible and marked as archived, but participants cannot access activities/materials. Owners can unarchive any time; previously enrolled learners remain archived and must be re-enrolled.
To archive a course
- In Course Settings, go to Course Status.

- Enable the Archive Course toggle.
- Read the warning message carefully.

- Click Update Course to save changes.
- Your course is now archived.
- Archived courses are marked with a flag.

To unarchive/reset a course
- Open the Course Settings page.
- Restore by either turning off Archive Course, or clicking Reset Course.

- If using the toggle, read warning and click Update Course.

- If using Reset Course, changes are saved automatically.

Auto-Archive Students
- In Course Settings, go to Auto-Archive Settings.
- Enable Auto-archive students on course completion.

- Set the delay days after completion (default 0 days means immediate).

Notification Settings
Manage student and course owner alerts (new activities, updates, deadlines, and enrolments).
- Go to Course Settings → Notification Settings.
- In Student Notifications, enable New Activities, Activity Updates, and Course Ending Soon.

- In Course Owner Notifications, enable New Enrolments and Course Ending Soon.
- Set Notification Timing (days before course end).

Adding and Editing a Section
- Click Add New Section.

- Enter a section name.
- Add a short description (optional).
- Click Save.

- The section appears in the course structure.
- To edit a section, click the edit button.

Adding Activities to Your Course
Click the + button and select the desired activity.

Text Activity
- Enter activity title.
- Add and format content in the editor.
- Click Save.

Document Activity
- Click + and choose Document.
- Enter title.
- Upload document (max 3.1 MB).
- Click Save.

Video Activity
- Click + and choose Video.
- Enter title.
- Upload by Browse/drag-and-drop or use embed URL code.


- Click Save.
Audio Activity
- Click + and choose Audio.
- Enter title.
- Upload audio file.
- Add description/details.
- Click Save.

Link Activity
- Click + and choose Link.
- Enter title and content URL.
- Add description (optional).
- Click Save.

Image Activity
- Click + and choose Image.
- Enter title and upload image.
- Choose image type: Activity image or Banner (Cover/Contain).
- Add description and click Save.

SCORM Activity
- Input activity title.
- Upload SCORM .zip file.
- Set optional passing score and completion behavior.
- Add optional description and click Save/Update.

Quiz Activity
Create assessments directly in Shrewd LMS with settings for attempts, timing, score thresholds, randomization, feedback, and progress inclusion.
- Open course, click Add Activity, and choose Quiz.
- Set quiz title and settings (questions per attempt, time limit, max attempts, passing score).

- Set randomization options.

- Configure feedback and enable Include in course progress.

- Save, then manage questions in Question Bank.

- Create/import questions and update quiz again to save.
Panorama Interactive Activity
Create immersive 360-degree scenes with hotspots (information and scene links).
- Add Panorama activity, enter title/description, click Save.

- Manage scenes and hotspots; add scenes and set default if needed.

- Add hotspots (Information or Link to Scene), set position with pitch/yaw or click-to-place in preview.

Interactive Image
The Interactive Image activity enables you to create interactive learning experiences by adding clickable hotspots to an image.
- In your course, select Add Activity, choose Interactive Image, and enter an Activity Title.

- Select the Hotspot Display Mode: Show all hotspots or Show hotspots one-by-one in order.

- Click Save to create the activity.
- Open Manage Interactive Image Scenes and Hotspots.

- Click Add Interactive Image to create a new scene.

- Enter a Scene Title, upload an image, and save the scene.

- Click Manage Hotspots of the scene you want to edit.

- Create a hotspot and choose its Type: Information or Link to Scene.

- Enter a Hotspot Title and, if using an Information hotspot, add the Popup Content. Save the hotspot.
- Repeat the process as needed. All created hotspots are listed in the Hotspot Manager for easy management.

- Position each hotspot by selecting it from the Hotspot Manager and placing it in the desired location on the image.

- Preview the activity. Depending on the selected display mode, hotspots will either appear all at once or be revealed one-by-one in sequence.

Assignment Activity
The Assignment activity allows learners to submit files for evaluation. Instructors can provide feedback and grades.
- Once you choose Assignment activity, configure the assignment by entering a title and defining the submission requirements. You can allow learners to submit text responses, upload files, or both. If file uploads are enabled, specify the permitted file types, maximum file size, and the number of submission attempts allowed.

- Enter the assignment details, including the passing score and description, then save the assignment.

- The assignment page appears as shown below from the learner’s perspective. Learners can submit their work by uploading a file, entering a text response, or both, depending on how the assignment has been configured.

- Teachers can review student submissions, assign grades, and provide feedback.

Setting Activity Requirements
Activity Requirements control learning sequence by requiring completion of selected activities before access is granted.
- Works across activity types including SCORM, BLC, quiz, and others.
- You can also set availability dates (Available From / Available Until).
- Open activity settings and expand Requirements.

- Select required prerequisite activities.
- Set availability dates if needed.

Setting Section Requirements
- Click Edit in the section area.

- In Requirements, choose prerequisite sections.

- Optionally set section availability dates.

Editing and Reordering Activities
- Use drag-and-drop to rearrange activities.

- Use edit menu to edit activity.

- Use delete menu to remove activity.

- Move an activity to another section.

Reordering Sections
Drag sections using the drag-and-drop icon and drop them in the desired position.

Course Reporting
Track member progress in the Reports tabParticipants Report
Shows participant details, completion progress, and individual scores. Enrolled students appear automatically in the table.

Filtering Participants
- Name or email
- Completion percentage
- Enrollment date range
- Enrollment status (Active/Archived)
- Enrollment type and progress status filters
- Items per page

Activity Completions Report
Provides a detailed activity-by-activity completion matrix for each participant.

Filtering Activity Completions
Filter by participant name/email and enrolment status (Active/Archived).

Student Scores (Gradebook)
Displays student performance across activities. Score-based activities (BLC/SCORM/Quiz) show percentages; non-score activities show completion dots.

Reports API (Premium Plan)
Integrate report data with your own organisational systems.
- Click the floating button in the upper-left corner.

- Select Settings.

- In API Integration, click Generate New Key.

- Use generated key to integrate with dashboards/analytics tools.

View Mode
Switch between Editing mode and Student ViewEditing mode is the default for owners to create and manage content. To preview learner experience, click Switch to Student View.

Student View shows the course exactly as learners see it. To return, click Switch to Editing.

Shrewd Global Report
Organisation-wide reporting dashboard accessible beyond TeamsShrewd LMS Global Report provides a centralised overview of courses and enrolled students across your organisation.
- Overall course activity
- Enrolment figures
- Overall and individual learning progress
How to Access via Microsoft Teams
- Open Microsoft Teams on your desktop or browser.
- In the left-hand menu, click Apps.
- Search for Shrewd LMS in the search bar.
- Select the app and click Add.
- Then open Shrewd LMS.
- You should now see the global dashboard with your organisation’s courses.
Tip: Pin the app to your sidebar for quicker access.


How to Access via Microsoft 365
- Sign in with your work account.
- Click Apps, then expand app list.
- Select Shrewd LMS to open Global Report.

How to Access via Outlook
- Open Outlook (web or desktop).
- Sign in with your work account.
- Click More apps from the left sidebar.
- Search for Shrewd LMS or select it from the list.
- The Global Report dashboard will open.

Courses Tab
The Courses tab displays all courses within your organisation, including their status, owner, participant count, and course dates. You can quickly browse available courses or search for a specific course using the search bar and status filter.
Click Manage on any course to open its management page, where you can configure course settings, manage content, enrolments, and other course-related features.

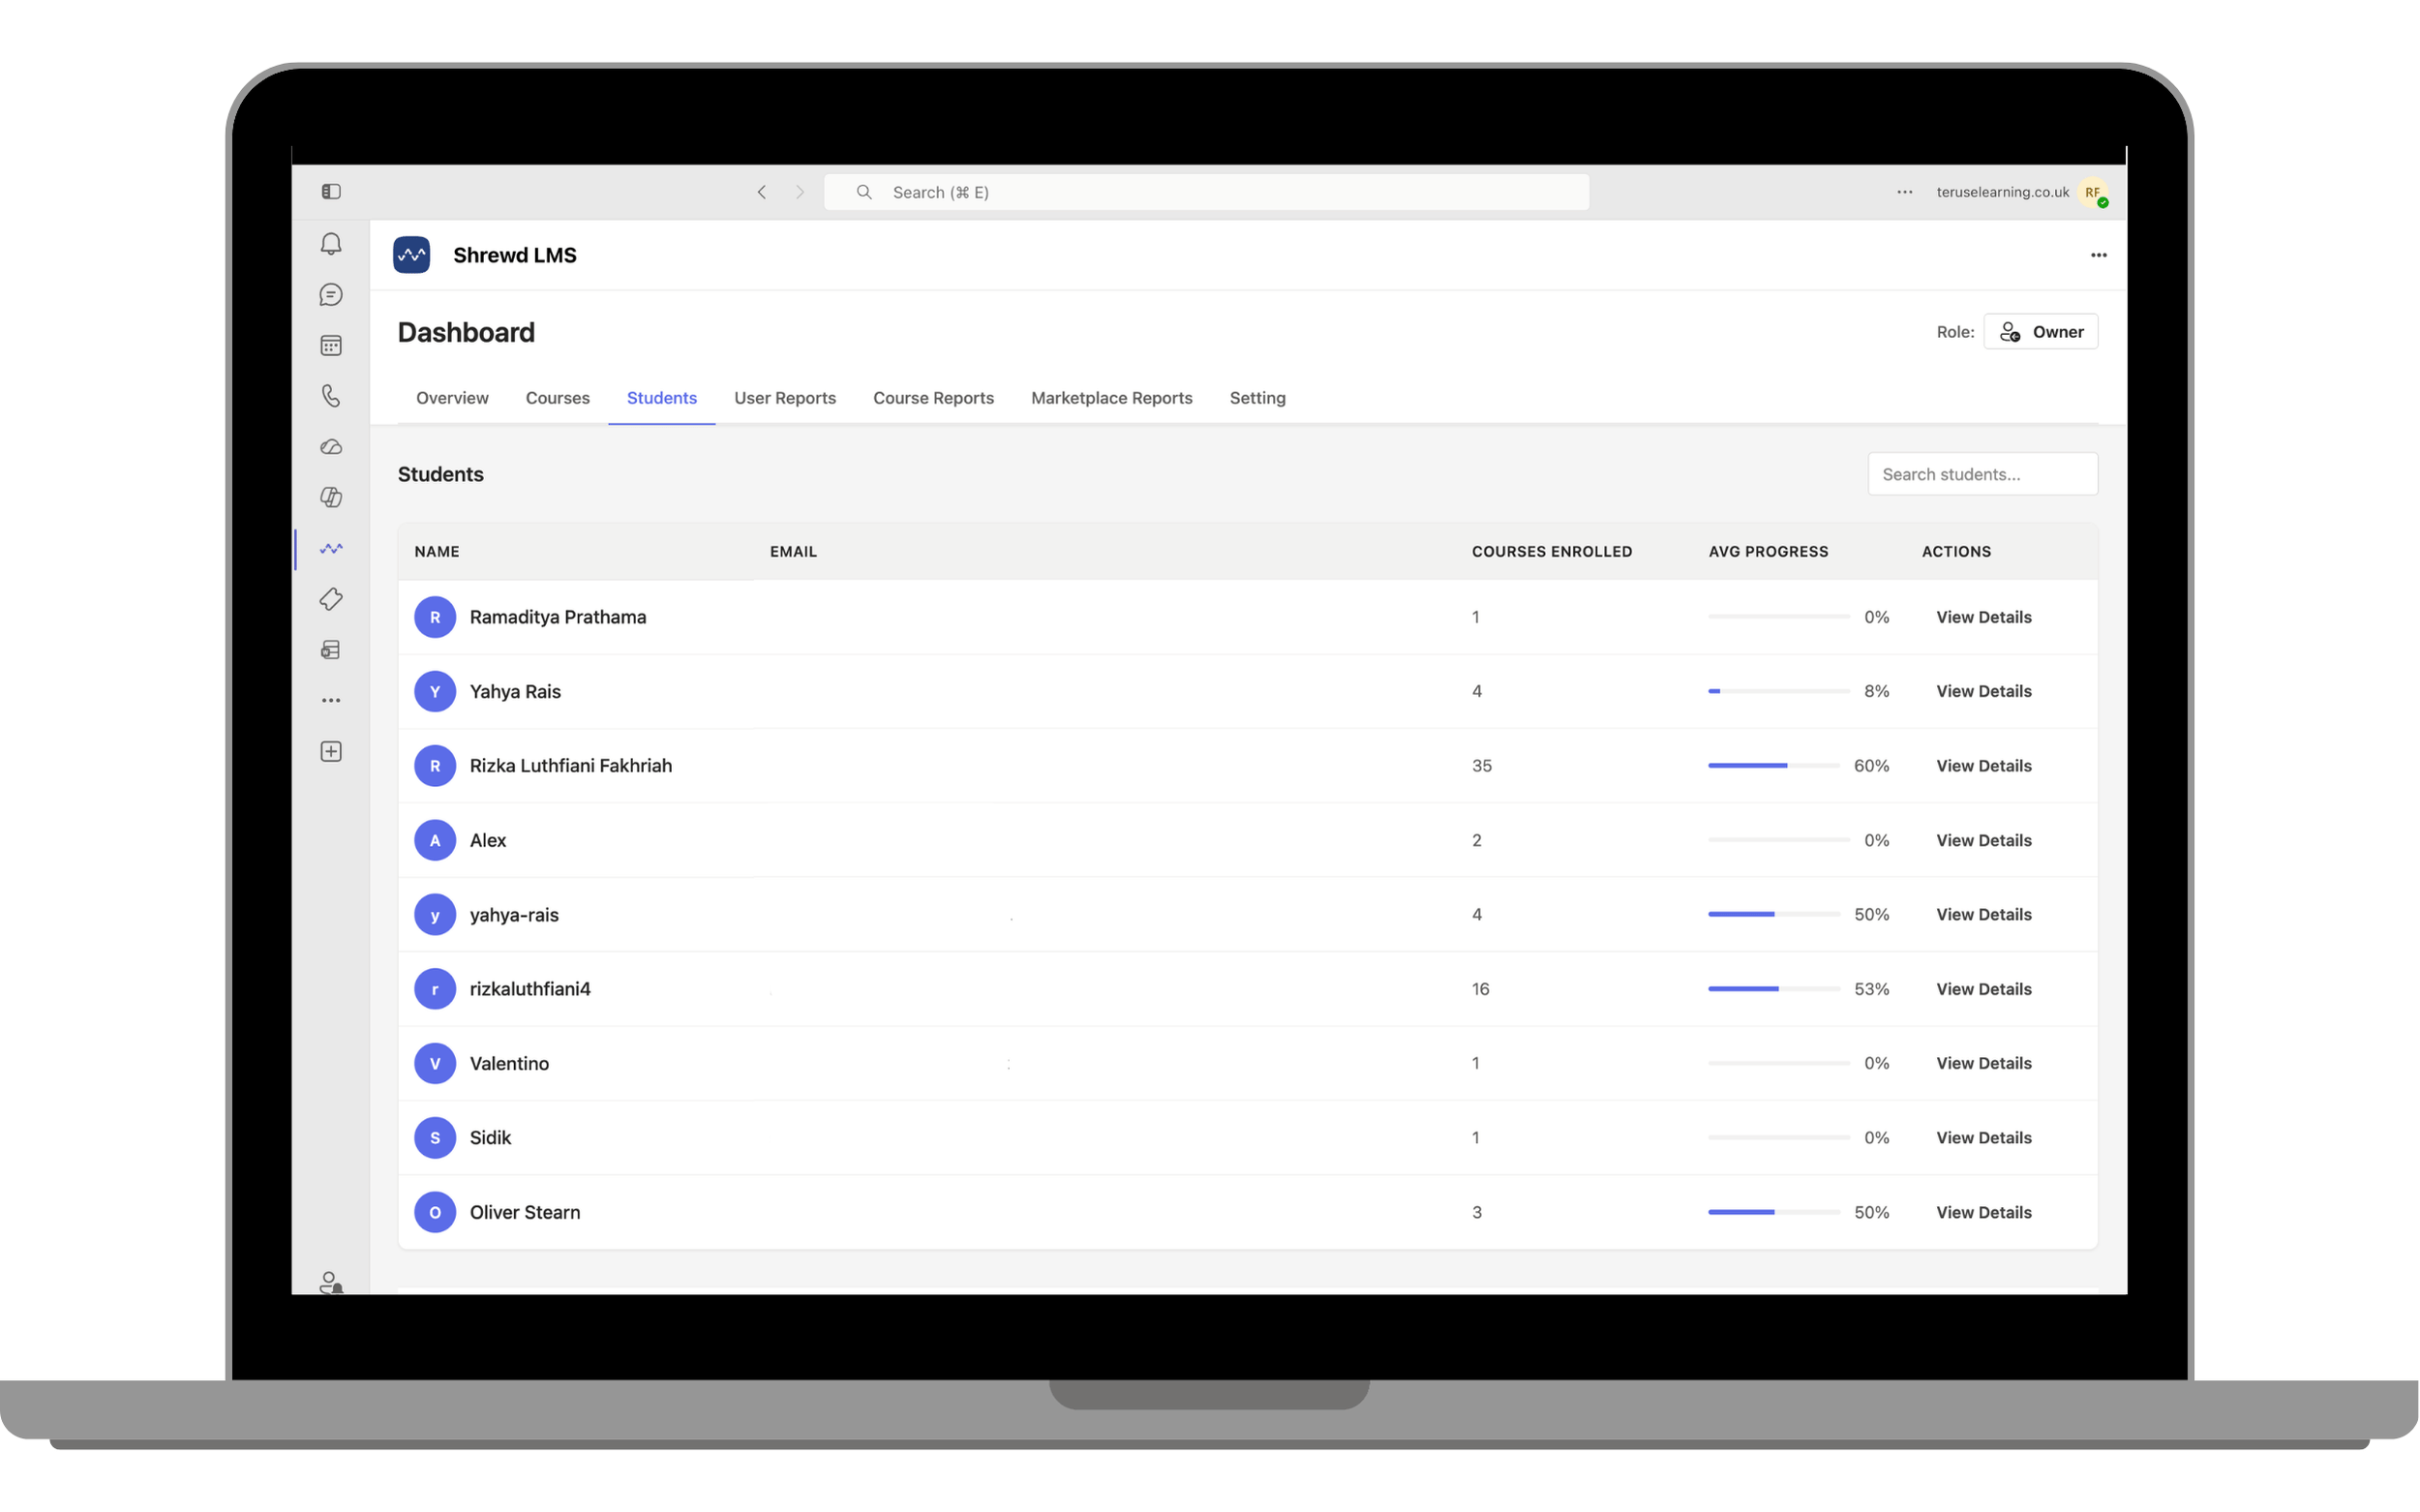
Students Tab
The Students tab displays all learners enrolled across your organisation, along with their email address, the number of courses they are enrolled in, and their average course progress. Use the search bar to quickly find a specific learner.
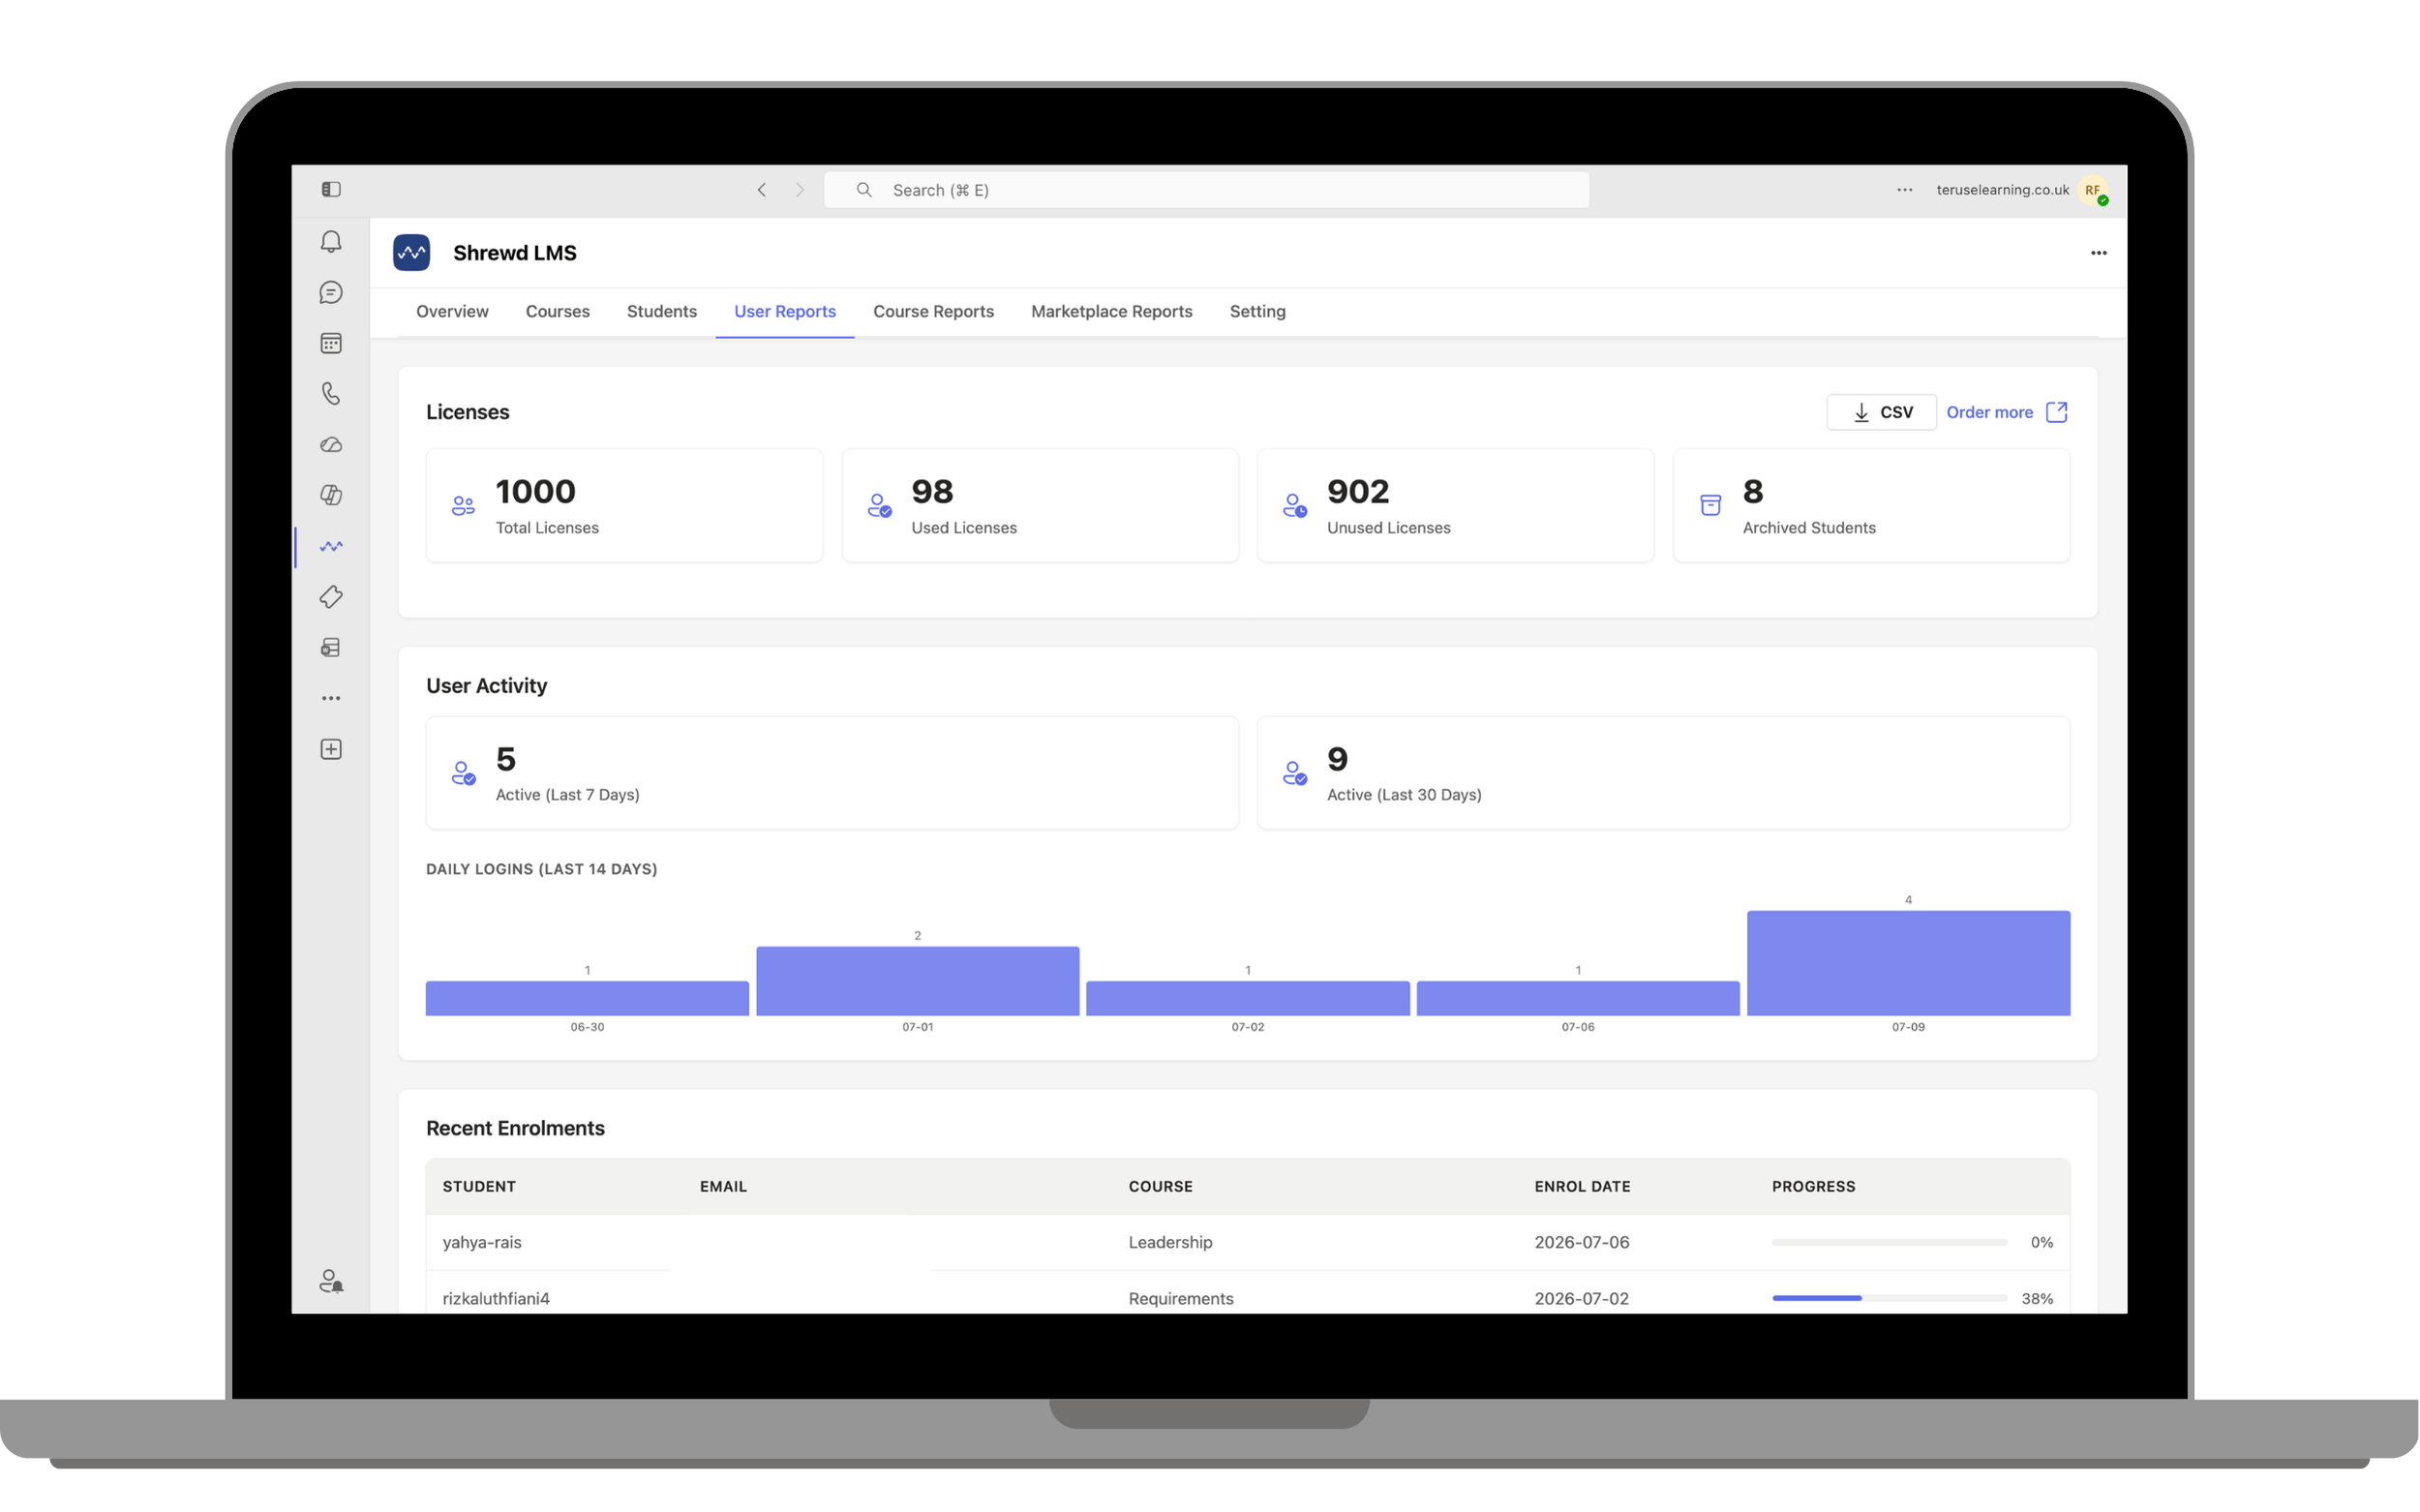
User Reports Tab
The User Reports tab provides an overview of user activity across your organisation, including licence usage, active learners, daily login trends, and recent enrolments. You can also export the report as a CSV file.
Use these reports to monitor learner engagement, track licence utilisation, and identify recently enrolled learners. This information can help you understand how learners are interacting with your courses.
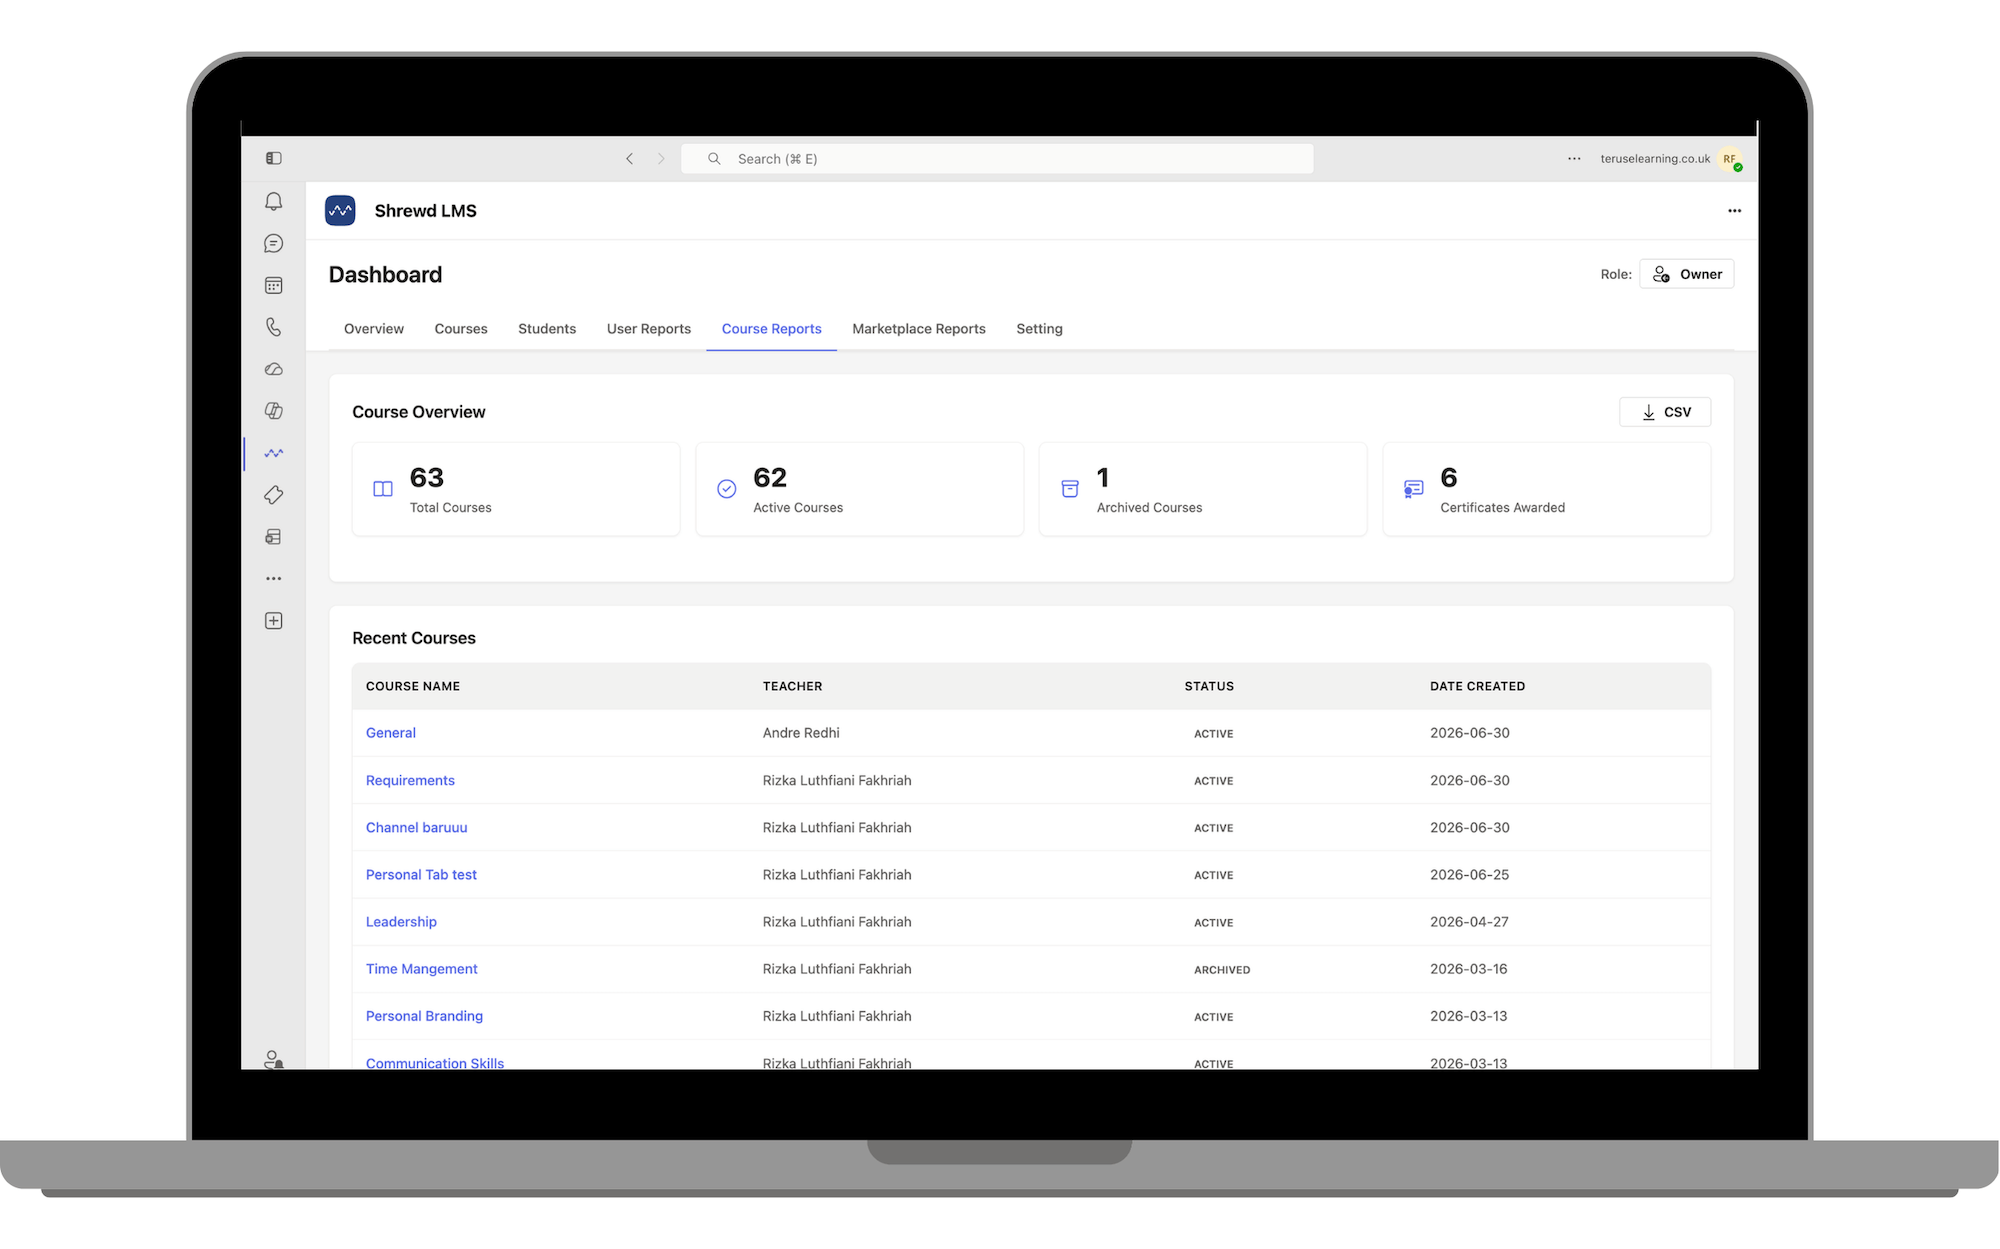
Course Reports Tab
The Course Reports tab provides an overview of all courses in your organisation, including the total number of courses, active and archived courses, and certificates awarded. You can also export the report as a CSV file.
Review the list of recent courses to view key information, such as the course name, teacher, status, and creation date. This helps you monitor course activity and track newly created courses.
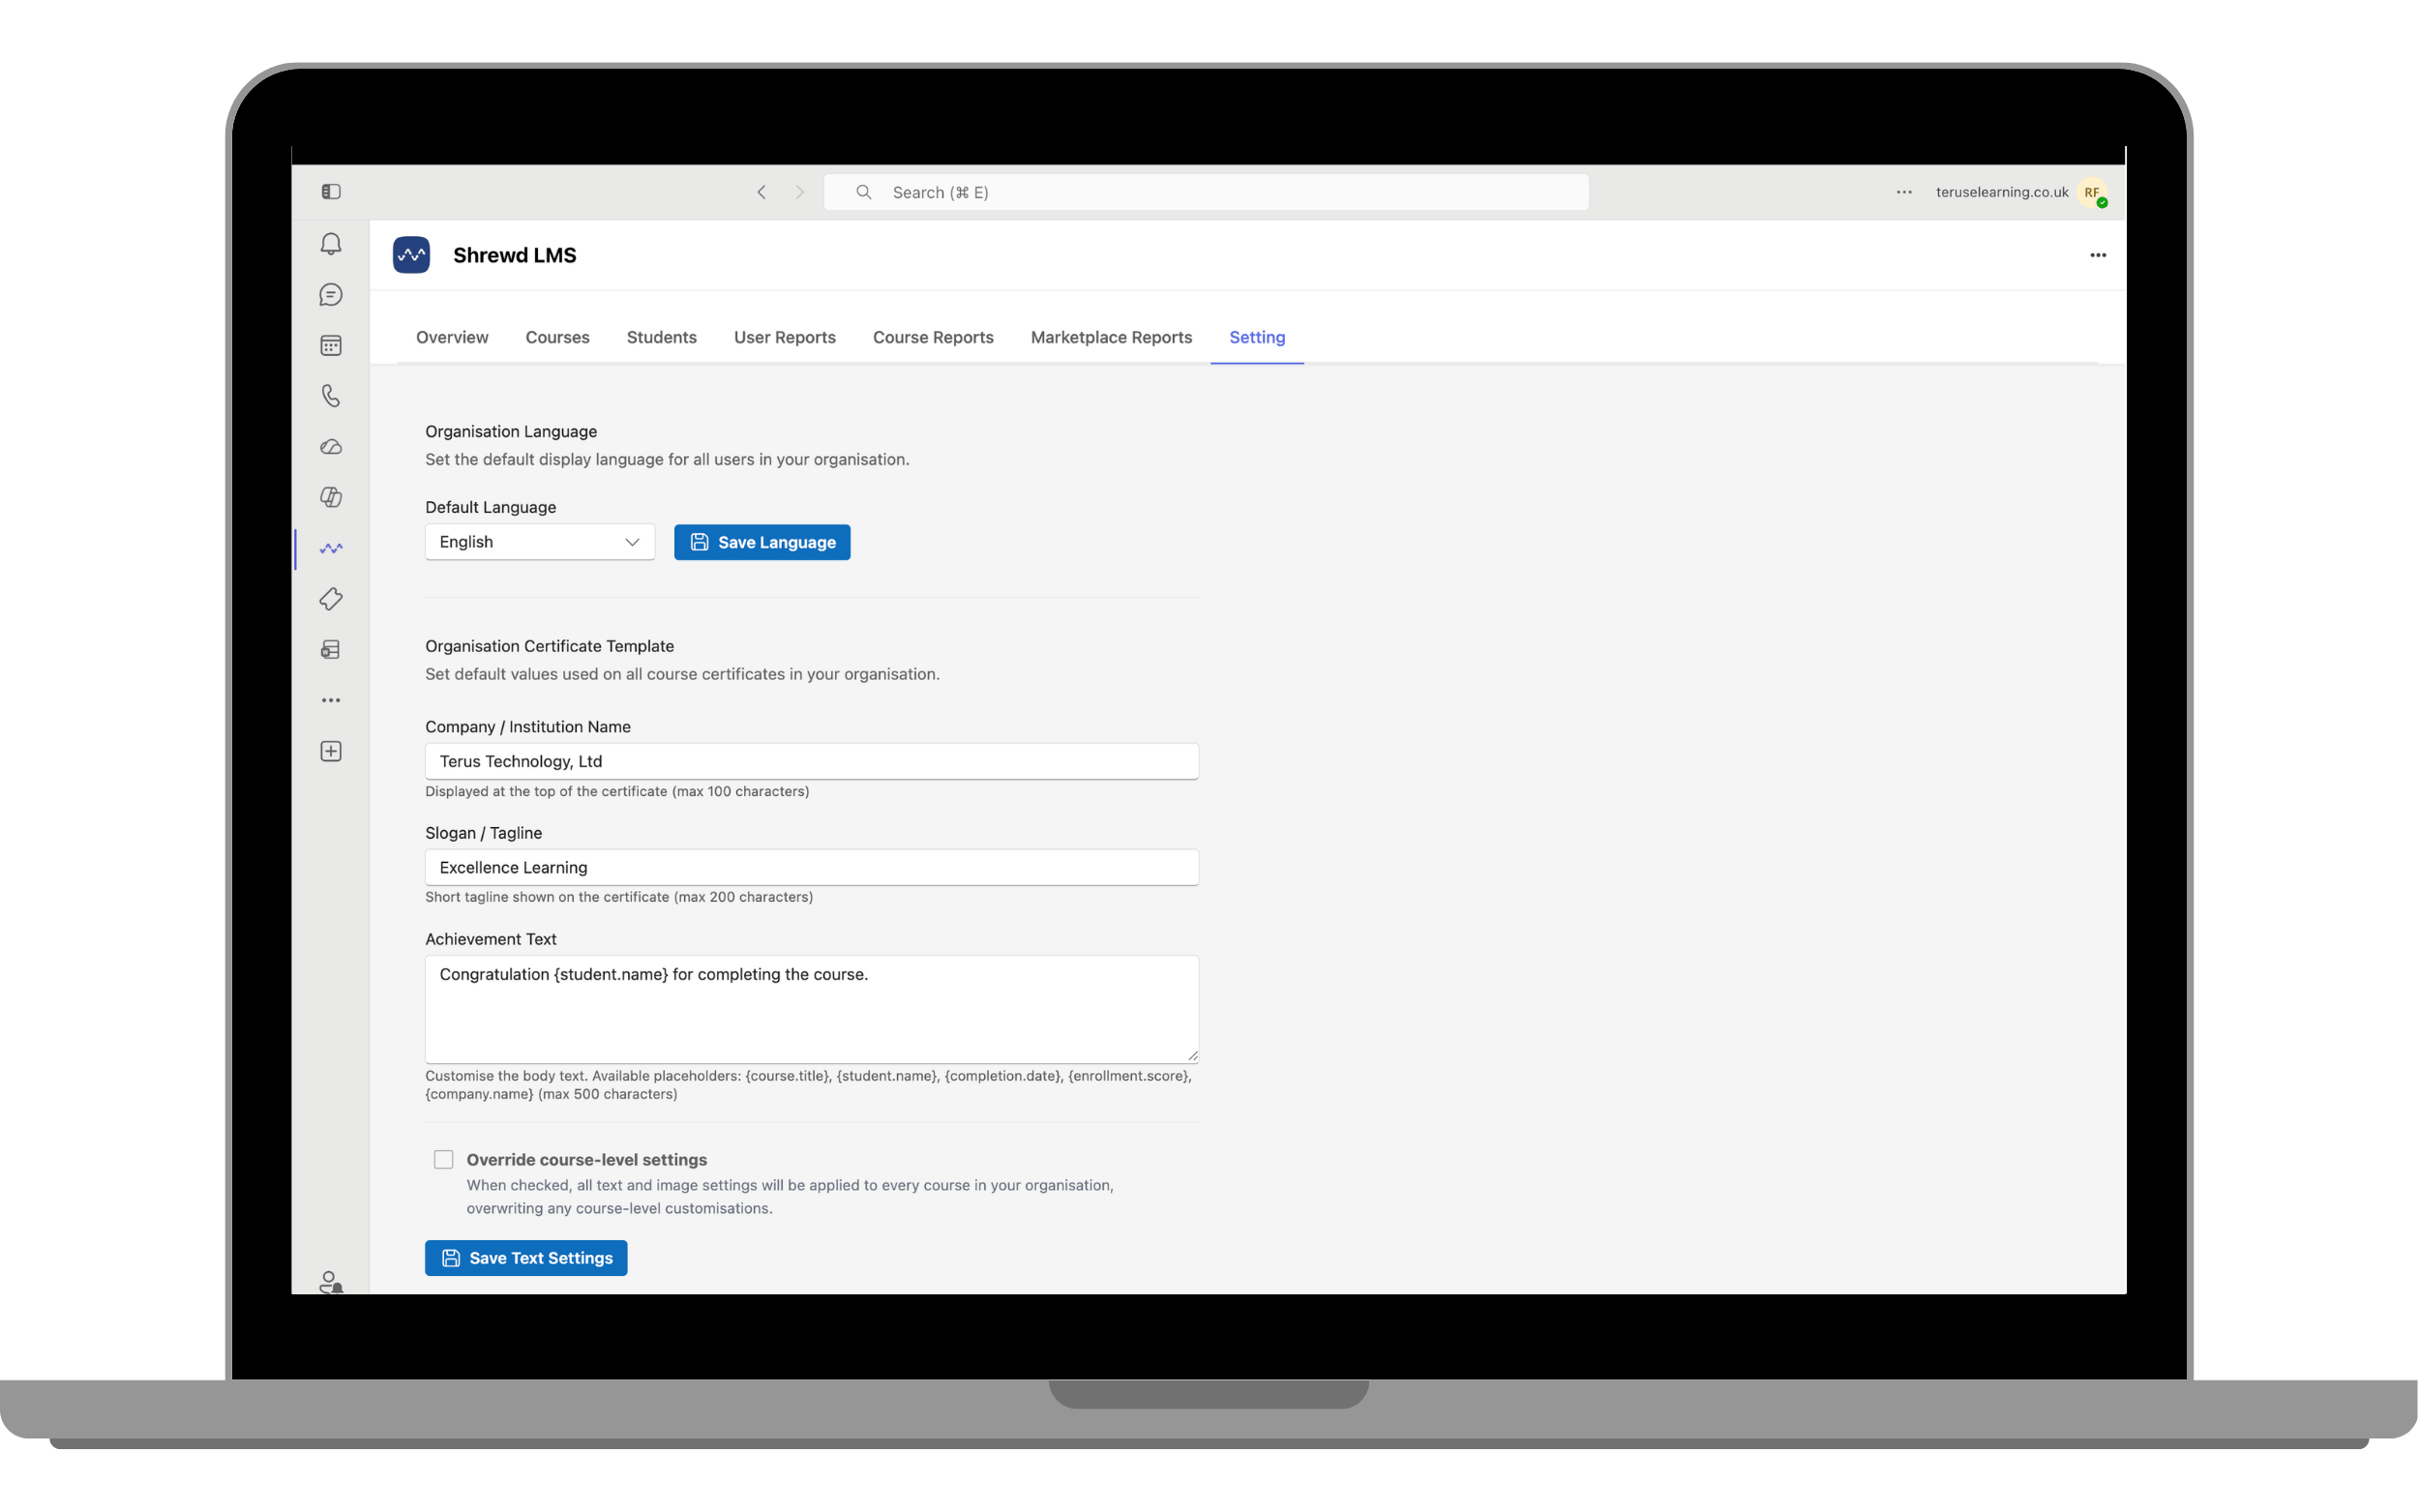
Settings Tab
The Settings tab allows you to configure organisation-wide preferences, including the default display language and certificate template settings. These settings are applied across your organisation.
Customise your certificate template by entering your organisation name, slogan, and achievement text. Course owners can also customise certificate settings for the courses they own from the course settings.